Changelog
2026-02-16: Official release of Win 11 support
Section titled “2026-02-16: Official release of Win 11 support”This release ends the preview period for Windows 11 support, transitioning it to general availability.
From today, there is a win11-24h2 base layer available. You can pass the --base-layer win11-24h2 flag to the avdcli bundle layers command to build a Windows 11 image.
On the 14th of March, this Windows 11 base layer will become the default (previously it was win10-22h2).
If you are using avdcli in a CI/CD pipeline, you can pin a base layer using the --base-layer flag to prevent any unplanned changes to your images.
2026-01-29: Win 11 support in preview
Section titled “2026-01-29: Win 11 support in preview”This release introduces preview support for Windows 11 to Schoolyear AVD. Some customers already used their own custom approach to Windows 11, but with this release we are starting a public preview period for our official Windows 11 support.
During the preview period, AVD admins can build images for Windows 11 and provide feedback. However, we recommend against using this preview version for production exams.
How to build a Windows 11 image with this preview version?
Section titled “How to build a Windows 11 image with this preview version?”When running the avdcli bundle layers command, you can pass the --base-layer win11-24h2-preview flag to build a Windows 11 image.
That’s it.
For layers that define a base_image, such as the Microsoft Office layer, you
need to update that property as well. If you are simply using our
com.schoolyear.win10-office365 layer, you can download the Windows 11 version
here.
Changes in avdcli
Section titled “Changes in avdcli”To support different Windows versions while maintaining backwards compatability, we have made some changes to the avdcli.
-
New parameters for the
avdcli bundle layerscommand-
--base-layer: Selects which base to use for building the exam image. Currently available options arewin10-22h2andwin11-24h2-preview. For now,win10-22h2remains the default. -
--layer-base-image: In case you have multiple custom layers with conflictingbase_imageproperties, use this flag to select which layer gets to decide. In practice, this is rarely used. Previously, this conflict was resolved in thebundle autobuildcommand. Now, this is decided in thebundle layerscommand, either by passing this flag or by prompting the user to select one.
-
-
Deprecated
--bundle-properties(bundle layers): this parameter is deprecated and will be removed in a future release.--layer-base-image(bundle autobuild): moved to thebundle layerscommand.
2025-10-29: Introduction of AVD alerts
Section titled “2025-10-29: Introduction of AVD alerts”To help you manage Incident response operations, we are introducing an AVD alerts page in the Secure Apps Console.
It supports collaboration and helps monitor response times. The new page logs recently failed exam deployments jobs,
recently failed deployment deletion jobs, alert recipients and first response times. Also, we included more information in the
alert e-mails and added an acknowledge feature. Note: Alerts for jobs that failed before this release, will not show up in this log.
2025-10-20: Detailed support controls (C2/3)
Section titled “2025-10-20: Detailed support controls (C2/3)”Upon popular request, we made the service controls regarding the incident response and key-user support more explicit. Existing expectations, such as response times and key-user support channels, are now codified in the control’s description. We split the key-user support from incident management due to their distinct requirements in response times and communication channels.
End result of the split:
- C.2 (Maintain an on-call schedule for incident response): clarified the on-call rotation, introduced an explicit 30-minute initial response target during time‑sensitive exam windows, and added guidance on coverage, contact methods, escalations, and concise runbooks.
- C.3 (Maintain a support rotation for key user support): clarified the existing key‑user support requirement, kept the 2-business day response target, and added guidance on channels, ticketing/traceability, and a lightweight knowledge base.
2025-10-17: Best practice adoption update
Section titled “2025-10-17: Best practice adoption update”Over the recent months, we have collectively gained a lot of experience with Schoolyear AVD and your implementations. Based on these experiences we are releasing a new dashboard update. The update focuses on the stability of the Schoolyear AVD service and on clarifying the different responsibilities between different user-roles.
The 4 changes are now available in the Schoolyear Beta environment and will become available in Schoolyear production environment as of 01-11-2025.
New features in this update:
-
Introduction of the
Secure Apps Console. -
Introduction of the
AVD Adminrole. -
Introduction of a configurable
buffer window(a time period between an app’s deployment completion and the start of an exam). -
Introduction of a
reservation timeoverride button in the app selection screen while configuring an exam. The reservation time is the configureddeployment time + buffer window.
Secure Apps Console
Section titled “Secure Apps Console”All the Schoolyear AVD settings (AVD add-on, Orchestration Jobs, Quota)
move from the general Admin Console to the Secure Apps console. You can
find the Secure Apps Console by following these instructions: Open the
Schoolyear Dashboard > Click on your name in the top right corner > Select
Secure Apps Console. The Secure Apps Console does not add any new
functionality, it only allows for more granular permissions.
AVD Admin role
Section titled “AVD Admin role”To edit settings in the new Secure Apps Console, users need the AVD Admin role.
This enables your educational institution to set more granular permissions.
General Schoolyear Admins have read-only rights in the Secure Apps Console.
Any user with Coordinator or Admin rights can be assigned the AVD Admin role.
Like the e-mail whitelist for AVD Support, only the Schoolyear Support team can assign the AVD Admin role.
We will use the current whitelist to automatically assign the roles. Please check if you have the role on November 1st.
Buffer window and override button
Section titled “Buffer window and override button” gantt
dateFormat HH:mm
axisFormat %H:%M
todayMarker off
tickInterval 60minute
section Deployment Time
Deployment time :a1, 05:30, 1h
section Buffer Window
Buffer window :a2, after a1, 2.5h
section Exam
Exam Start :milestone, a3, 09:00, 0h
The Buffer window is a time window in which you, as an AVD Admin, can respond to any incidents. It ensures there is enough time to perform a completely new exam deployment if necessary. Guidance on what to do when responding to incidents can be found here.
The buffer window is added as a setting in the AVD Add-on for each app.
Before you could only configure a deployment time, which was used for (1) deploying the resources to Azure and (2) as the timeframe to respond to possible incidents. With this new functionality you can create a buffer window between the deployment’s completion and the start of exams.
As mentioned above, the update introduces an enforcement of a minimum of 1 hour for deployment times
and a minimum of 2.5 x the configured deployment time for the buffer window. The update will start enforcing the
minimum deployment and buffer window times from the 14th of November.
Where necessary, from this date, we are automatically increasing them to the minimum values.
For some institutions, this might mean exam times overlap, which might neccessate
a higher quota in Azure.
Make sure you change the quota in both the Azure Portal and in the Schoolyear Dashboard.
Override button
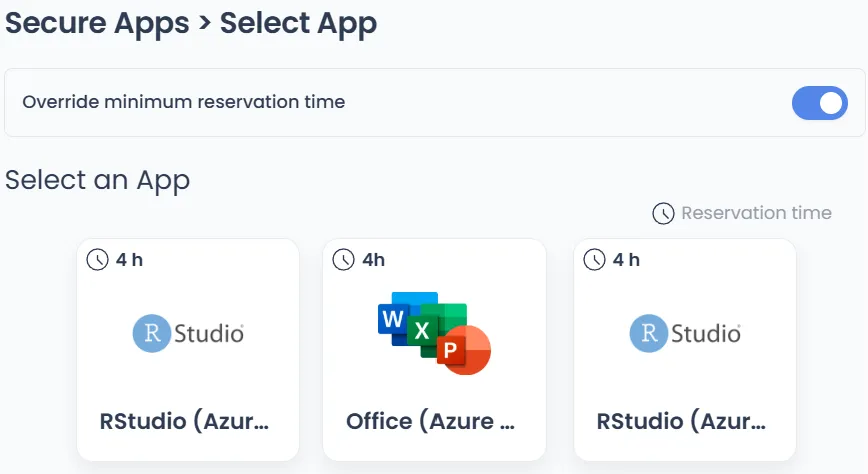
The new Buffer window feature includes an override button. For emergency situations and for testing purposes, Admins and AVD Admins have a toggle to override the minimum reservation time (deployment time + buffer window time) in the App selection screen. Turning the toggle on will enable you to select apps any app, it will ignore the reservation time. If applicable, immediately starting an Azure deployment.
2025-10-15: Change in Remote Desktop Web client
Section titled “2025-10-15: Change in Remote Desktop Web client”Microsoft is deprecating their Remote Desktop PC Web client on the 17th of November. This means the Schoolyear solution needs to switch to the new version. For AVD V2.1 add-on installations, this change is automatic. From the 15th of October 2025 you can test this on the beta environment of Schoolyear. A new deployment automatically uses the new client. A production release is expected to become available around the 1st of November.
The impact on users is minimal. Changing the client mainly changes the screens behind the overlay shown during start-up. It also slightly changes the UI of the Remote Desktop overlay. (Typically unnoticed by students, the drop-down menu at the centre top of the screen. Schoolyear hides this automatically when clicked.)
Something of note is that the new client no longer has the undocumented feature to use private links, this means Azure exam workspaces will be visible in the Windows App portal outside of Schoolyear. Of course, you won’t be able to connect to an exam workspace outside of Schoolyear.
For your reference, the url changes from https://client.wvd.microsoft.com/arm/webclient/index.html to https://windows.cloud.microsoft.
2025-09-02: Managed Identity Operator role
Section titled “2025-09-02: Managed Identity Operator role”Starting with release v2.0.60, we now assign the Managed Identity Operator role to the managed identity created during the infrastructure installation step in the AVD Addon. This change is necessary to optimize our avdcli executable and enable Azure Image Builder to download large files.
Important: If you’re using avdcli version 2.0.6 or newer without the infrastructure from avd-deployments version 2.0.60 (or newer), your image build will fail with an error indicating that the managed identity is missing.
Manual Role Assignment
Section titled “Manual Role Assignment”To resolve this issue and use the latest version of avdcli without problems, you can manually assign the Managed Identity Operator role:
-
In the Azure Portal, navigate to Managed Identities.
-
Select the managed identity with the name you provided during infrastructure installation.
-
Navigate to the Access Control (IAM) tab.
-
Click +Add → Add role assignment.
-
Search for
Managed Identity Operator, select it, and click Next. -
Click + Select members and search for the managed identity with the name you provided.
-
Select the managed identity and click Review + assign.
After completing these steps, you should see the Managed Identity Operator role assigned to your managed identity in its Access Control tab.